Monday, July 30, 2012

Sew in Tune- A Radiohead Robe. Kind of.


Hey guys, today I'm over at Stacey's for the fun Sew in Tune series, talking about how I made this robe for Hendrix and my love of Radiohead. Check out my post here. 


If you don't go for me, go so you can leave a comment and enter the giveaway for Melissa's (MellySews) new ebook of patterns for boys, Blank Slate Patterns. I am SO EXCITED to get my hands on these patterns. I think the concept is brilliant. They really are blank basics that can be customized however you like, which I think is exactly what we who sew for boys need! But basic as they are, they are very stylish and look to have a great modern fit. I truly think you could buy this ebook and be set on making your boy's wardrobe from 18 mo to 8 yrs. It always makes me so happy to see talented women like Melissa stepping out in bravery and making their talent a business. You go girl. Just kidding, I don't say that. Except for right now. 


Hope you have a happy Monday! I'll be attempting to baste a quilt. With pins. Yikes. 


Friday, July 27, 2012

Interrupting Pirate


This was me late Wednesday night after a visit to a very questionable urgent care. A babysitter was scheduled to come at 9 that night so we could finally go see Dark Knight Rises. (I cannot overemphasize how excited I was to see this movie.) About an hour before that, Hendrix was sitting on my lap on the couch singing me a nice song. Then he decided to tickle my face, which turned out to just be slashing my cornea with his fingernail. The Dr. said it was the biggest corneal abrasion he's ever seen, but he also decided an eye patch was all it needed, then sent me home. Obviously, I wasn't going to be visiting the movie theater that night.

After a night and morning of feeling like my entire eyelid was lined with needles, I finally went to a real eye doc. He gave me a protective contact lens, so the patch was no longer needed. Also drops for pain and antibiotics for infection. And he had me come back today to check on the progress.

The moral is, urgent care guy sucks, always see the real eye doctor. Like my husband says, the eyes are the testicles of the face.

The other moral is that kids ruin everything. You love them to death, but don't tell me it's not true.

Anyway, most of my sewing and blogging plans were interrupted by this, not to mention the big batman plans. It's getting much better, but it still burns to look at a screen for very long. So now I'm going to have to put on my shades and try to suffer thru Project Runway.


Mostly I just wanted to show you how I was a legitimate pirate for a day.


By the way, voting for Shorts on the Line is up at Imagine Gnats! If you were a fan of our mini SteveZ, I'd love for you to vote for Hendrix's Euro-shorts, #33.


Go here to vote.
Go here if you missed Film Petit: Life Aquatic


Tuesday, July 24, 2012

Bubble Painting and Sewing Gifts


blog button final


Today I'm over at Kiki and Company with a fun summer activity involving painting and bubbles. It's brilliantly entitled "Bubble Painting." Go here to check out the fun I had with my buddy Ryan making this fun art. Also look around at some of the other great posts in Kiki's series- she is having all kinds of fun over there!


Also make sure to check out Jacey's blog to see the amazing gifts she sent me last week! If you've been around a while, you may remember this mini quilt I made a while back. It was actually sent to her, and now she has paid me back in the greatest way. I seriously love my new pincushion, fabric basket and sewing kit. Can you believe I haven't been using a pincushion for most of my sewing career? What in the world?

FO: Zakka Style Sewing Kit

She really picked the greatest fabrics for me. (Her picture) Thanks so much Jacey!! 


I feel so behind in sharing things I've been making with you! I finished a quilt recently that I hope to get photographs of in the next couple days. I'm also really excited to be making my own version of my buddy Maureen's West Elm inspired pillow:

Indie Pillow inspired by West Elm Kantha Chevron Pillows -- tutorial to come soon!! To be shared on the West Elm blog!

Isn't is crazy gorgeous? I can't wait to put my own spin on it. (See I told you I can't get away from those damn chevron patterns!)

The whole project has inspired me to give our living room a bit of a makeover, so today I made curtains and I hope to make two or three more new pillow covers soon as well. 

Quilt wise, I'm really close to finishing a gift quilt and then I'm itching to finish up the scrappy +&x. That one is always getting put on the back burner because it's just for me, but I WILL finish before fall is here!

On the kids' clothing front, the next installment of Film Petit is in the works already and we are pumped about this one. Just chuffed to bits.


Do you ever finish a blog post and think to yourself, "Wow, I really used way too many exclamation points on this one. How obnoxious... Oh well!!!"

Yeah, me neither. 


Friday, July 20, 2012

Fall Fabric Sneaky Peeks

(Business first: The winner of Wednesday's Peekaboo pattern giveaway is commenter #45 Rhonda D. Congrats! I'll be emailing you!)


If you are new here, you may not yet know that I work in a pretty little fabric shop called Sewn Studio. (See some of my pictures of it here.)

As if it wasn't fun enough to work in a place filled with great fabric and people who love sewing, sometimes there are extra special perks. This week, that meant getting to be in a meeting with the Freespirit rep and see all kinds of fabric lines that haven't even previewed online or at Quilt Market yet.

I thought you might enjoy seeing just a little of what I saw, although there aren't tons of pictures. It was just what I could snap on my phone while trying not to be too annoying to my boss, who was actually trying to make thoughtful decisions about ordering all this stuff.


This is Joel Dewberry. Collection is called Notting Hill and I think it's due out in November. There are two other colorways, but this was my favorite and I think it may be the one we ordered. I love the plaid and that art deco-ish print that's above it. And how fun are those scandinavian looking round flowers?


Valori Wells. I totally missed the name of this, but it's got really great color combos. Love the yellow flowers, and REALLY love those tear drop-ish prints in the upper right corner. (Sorry, hard to see those.)


 New Parson Gray by David Butler. I like that he used a lot more of the warmer colors in this one. Those overlapping circles are very very cool.


Very excited by this one! It's Jay McCarroll. (Again, missed the name of it.) Of course I love the city buildings and maps. Plus the pops of hot pink are killer. But I'm most drawn to that print in the upper left corner. I need to make myself a garment of some sort in that one. 


And we got to comb through the actual fabric samples of Anna Maria Horner's Field Study, which you've probably already seen and is due out next month. Totally had that Moonrise Kingdom feel that I'm so in love with right now. And of course, the genius-level AMH use of color you've some to expect.


If you follow me on Instagram, you saw these in real time on Tuesday. I'm pretty addicted to it now, so if you fancy following me on IG, I'm alittlegressica.


One more thing to share in Sewn Studio news- we are having a giveaway on our blog for one Figgy's pattern of your choice. Enter here.


Have a great weekend! I'll be sewing and hopefully pooling :)


Wednesday, July 18, 2012

The Retro Romper: review and giveaway


This girl is ready to pounce.

I am enjoying so much all the girly things I've been getting to make her lately. But MAN is she hard to photograph. I think she is just about twice as wild as Hendrix ever was at her age, and definitely twice as clumsy.

So from wild Elsie and me, welcome to my stop on the Peekaboo Pattern Shop blog tour!


This pattern is called the Retro Romper, and it's quickly turning into my favorite little outfit. First I should mention that today only, this pattern is only $5. So if you like it, you should snag it up now... but also read my super helpful and informative review :)

Fabric: 
I used a clearance navy fabric from the shop I work in called Many Eyes Seeing (weird name) and solid white Bella for the trim. My original thinking in choosing the navy was that this would be an outfit for the Fourth, but that did not happen in time. Even so, this little romper is so summery, that even the dark color looks great. It's totally nautical- so hot right now. (Hansel)

Pattern Pieces: 
There are five pattern pieces, and they were clearly marked and easy to print and understand.  (All Peekaboo Patterns are PDF downloads.) The cutting instructions for non-pattern pieces are also clear. 

Pattern instructions:
Everything came together fairly easily. The gathering on the bodice works nicely with the collar and halter straps, which is the design element that really drew me to the pattern. I also love the sweet elastic gathered back.

The instructions themselves are clear enough if you have followed a couple of clothing patterns before. I don't feel like this is something for a first time pattern sewer, just because some little things are taken for granted, but nothing major. If you have just a few clothing projects under your belt, you would be able to follow with no problems. There are also pictures for nearly every little step, which is always helpful.


Changes:
I made the 18 month size for Elsie, which Amy did warn me might be a little long. When I got the main part of the romper done, it was almost to her ankles and just looked odd at that length. I think in the older sizes that shape works really well, because I like the vintage-looking length in the sample photos.  But I decided it wasn't working on Elsie, especially with the darker fabric. So I chopped off a good four or five inches, re-did the crotch and added simple white cuffs. It was a super quick fix, and I ended up LOVING the shortie version on her.

And she loves it too. She can do all her climbing and troublemaking easily and comfortably. See? Look at that cheese:


Giveaway Time! (Do I even DO those things?! Apparently.)

****Giveaway now closed, winner is #45, Rhonda D. Congrats!*****


Amy from Peekaboo Patterns is offering such a great prize package to one of my readers- three patterns from her shop, your choice. What I love about Peekaboo is that there are so many options! Amy has boy stuff, girl stuff, hats, PJs, dresses, jackets, even several swimsuit patterns. Go look around and it will not be hard to find three patterns you will want to try. 


To enter the giveaway, just leave a comment here telling me your favorite Peekaboo pattern

If you are the sort that likes extra chances to win, one extra chance each for liking the Peekaboo Facebook page and for liking my new Facebook page. Just leave me another comment for each. I'll pick a random winner Friday.


***But don't forget about the $5 romper! If you end up winning, you just get to pick three MORE good ones. And be sure to follow the tour on these other stellar blogs:


nap time craftersScattered Thoughts of a Crafty MomCrazy Little ProjectsMelly SewsMama Says SewElegance & Elephants2 Little HooligansA Little GraySew a Straight LineLily Bloom StudioShwin & ShwinOccasionally CraftyGirl.InspiredSew Country ChickSumo's Sweet StuffSweetheart HalterEvelyn dressWaikikiSanta MonicaPier 49Bubble ShortsSailor ShortsRetro RomperJack & Jill ShortallsJasmine DressNatalieClaraIsabellaJackieSea BreezeImage Map

Tuesday, July 17, 2012

Metro Pocket Skirt Tutorial


I made this skirt as a part of the fantastic Skirting the Issue event at Project Run & Play and Simple Simon. Liz and Elizabeth have put together a great effort to get at least 100 skirts donated to girls in foster care by August. There are even crazy-good prizes available for those who upload pictures of skirts made to the flickr group- ahem, a new sewing machine for one!


Inspiration
This skirt had several sources of inspiration. At our quilt guild last month, a member gave a little presentation about how to make and use prairie points. It's basically just folding squares of fabrics into triangles. They are not something I would probably ever use on a quilt, BUT then I saw a dress at Anthropologie that had really cool pockets shaped like this. I immediately thought of the prairie points. So because the fabric is folded and crosses over in different directions, I really wanted to do it in stripes. After spending $20 on some nice striped fabric, I decided it was not the perfect thing after all. (Of course. Yeesh.) There was not much left to do but look to my stash. I remembered the dark teal/ kelly green color scheme I've been dying to use since I saw Zooey Daschanel wear it on her tv show. Thus, a skirt was born. 

....That was quite a long story about inspiration, but maybe sometimes hearing about inspiration is inspiring. 


Basic Skirt Info
About the basic skirt, it's just a classic gathered waist ditty, like Dana's or like the Lazy Days skirt without the ribbon hem. I did make one little change, and that was to make an extra wide casing at the waistband. I folded the top of the skirt down half an inch, and then 2 inches. I sewed at the edge of that bottom fold, leaving a space for putting the elastic in like normal. Then I stitched all the way around again, about 3/4" from the very top fold, no opening this time. Then I put in the 1" elastic and closed it up. This is what gives it that little ruffle around the top.

It's a size 10-12, see this size chart for measurements.


Fabric
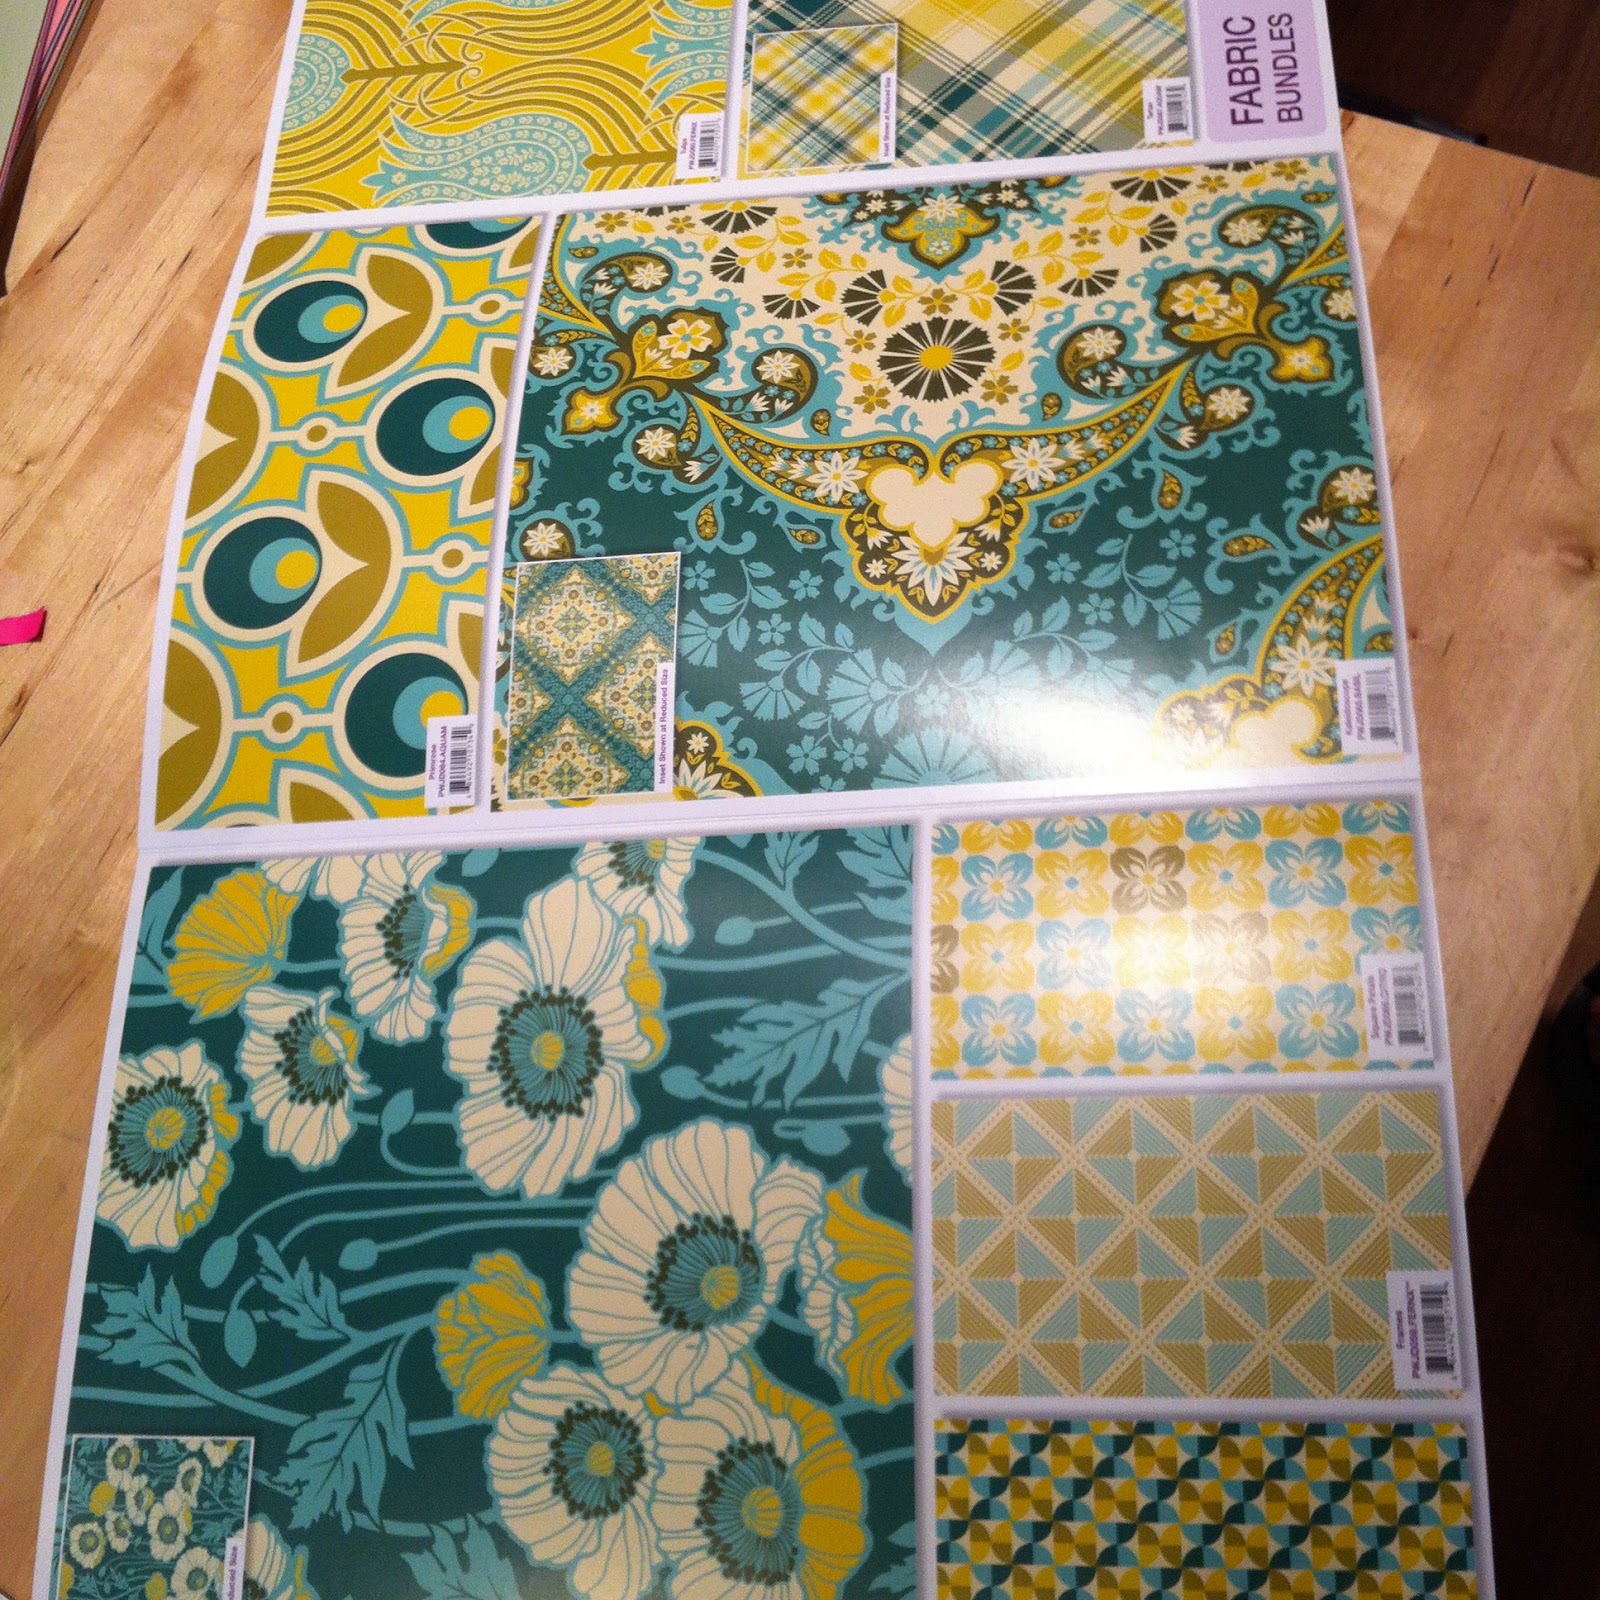
The priants on the pocket are from the super fun Summersville line by Lu Summers. I can't get enough of those designs.

The main fabric is really special. It's by an artist named Marcia Derse, who I had never heard of before I stumbled across her booth at a recent quilt festival in town. I was smitten with the color and painterly look of this print. Good thing I still have a yard left for me!
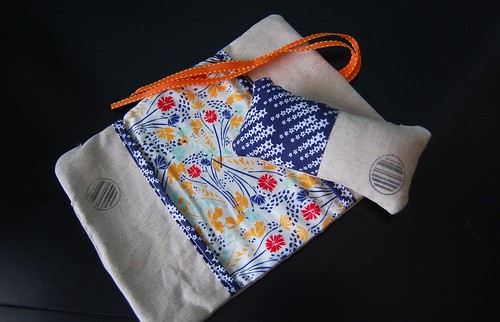


Pocket
Ok let's make this prairie pocket! No, ummm, a metro pocket because that sounds much cooler.


Cut two 10" squares of fabric for each pocket. Place your first piece wrong side up and bring two corners together, so the wrong sides are facing. Press.


Bring the two corners that are at either end of the fold together so that it's a triangle with four layers now. Press well and repeat on the other piece.


Cut two pieces of binding fabric, each 2.5" x 12." These do not need to be cut on the bias. One at a time, fold the long edges together and press. Then open up and fold the long raw edges in to meet that middle fold you just made. Press well.

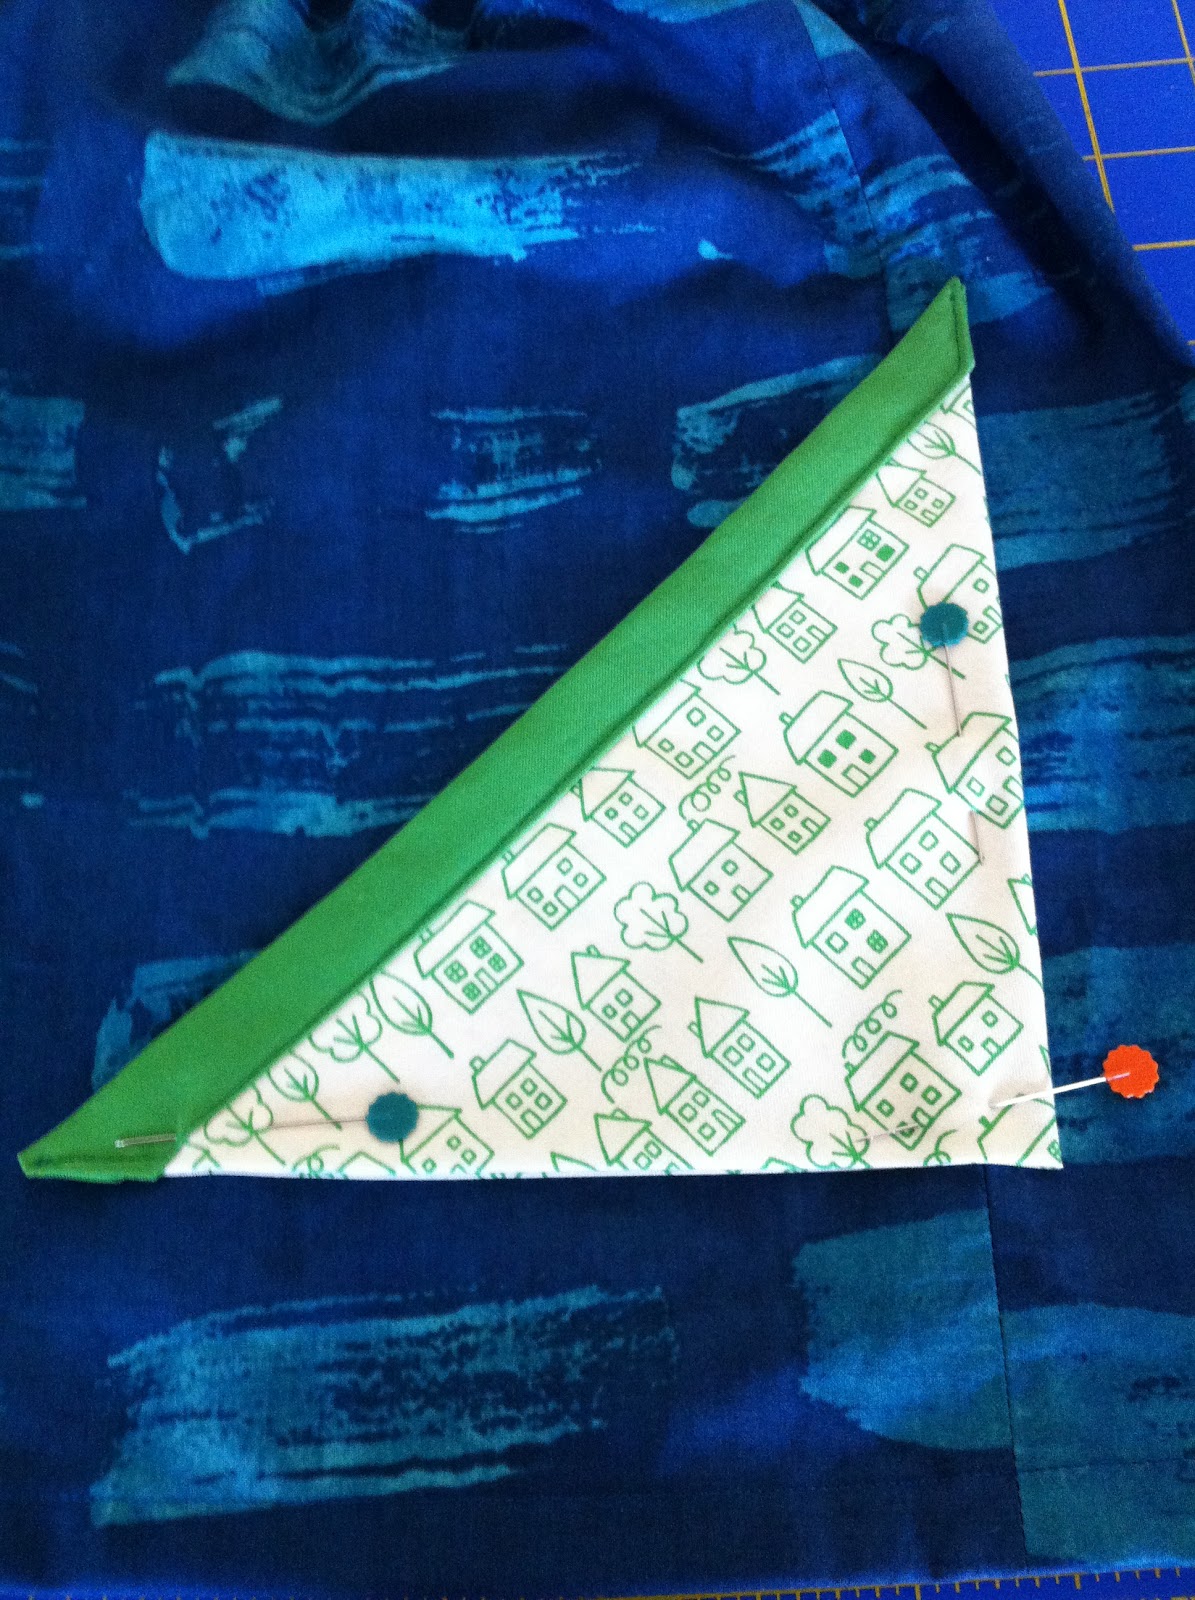
Now open up all the folds. On the back of your folded triangle, pin the long raw edge of the binding to the raw edge of the triangle, right sides together. Stitch right inside of the fold that is closest to the edge. 


Turn the whole thing over to the front side and refold the other raw edge of the binding into the middle. Trim the short edges of the binding so they just extend a little bit past the corners of the triangle.


Fold the corners of the binding inside like this on both sides.


Then bring the fold over and pin on the front of the triangle so that the binding covers over your last line of stitching. Start at the very left corner, topstitch down the edge all the way to the other corner, pivoting where the fold in the binding does.

Repeat the binding steps on the other triangle.


Layout both pieces on the skirt to see exactly where it looks best. I placed mine 2.5" from the hem, and overlapping the side seam by half an inch.


After figuring out the placement, take off the top layer of the pocket and pin the bottom triangle in place. Start at the bottom corner and edge stitch across the bottom and to the top corner. Be sure to backstitch at these corners to reinforce.


Now place the top triangle back in place, but pin it about 1/8" below the bottom of the other piece. It would be too many layers of fabric to stitch thru if it was places directly on top. Edge stitch this piece on the side and bottom, and your pocket is complete.


I chose to make one oversized pocket on this skirt, but all you need to do to adjust pocket size is change the size of your original fabric squares. I can't wait to put these pockets on so many other things- dresses, tunics, shorts, a purse, anything!


Have fun with these pockets, and don't forget to check out the rest of the cute skirt tutorials on Project Run & Play!


Thursday, July 12, 2012

Shorts and Social


Today I'm over at Small and Friendly for my turn in the Shorts on a Line series. There have been some seriously cute ideas so far, so make sure you check all the posts out while you are there!


shorts on the line button


And, bonus: I got to use my Simplest Summer Top tutorial again when I realized I needed to take pictures of these shorts and Elsie had nothing that matched them. It was either that or a topless baby girl... which would not have been a crisis exactly, but yay for more clothes made by mamma!


Check out the full post here, with my tips on how to hem your shorts with contrast bindings. 


And more big news: Thanks to certain peer pressures, I finally got a Facebook page for the blog!


Wednesday, July 11, 2012

Simplest Summer Top Tutorial

This is my last tutorial from Project Run & Play. Figured I had better share it here before the time for making summer tops is over!


Happy Wednesday PR&P fans! Thank you so much again for everyone who voted this week, whether you voted for my look or not. We just all love it that you are here cheering us on and waiting to see what we make next. It's incredibly fun!

Today I am going to show you the simple formula for making this easy halter tie top. You really can't go wrong with this one, it's so quick and cute.


The top is just a tube made of two rectangles of fabric with elastic at the top and bottom and long ties added. You'll need about a half yard of fabric and 1/4" and 3/4" elastic. 


First you need to figure out what size to cut your rectangles. Find a t-shirt that is fitted well to your girly. Measure the shirt hem lying flat. In other words, the distance across just the front of the shirt, not all the way around. Add 2.5" to that for the length of your two pieces. Mine was 12" so I cut my fabric pieces to 14.5" long. 

Now measure the shirt from the very bottom to the armpit, where the sleeve meets the shirt. Add 3.5" to that number and you have the width of your rectangles. Mine was 9" so my width was 12.5." My two rectangles measured 14.5" x 12.5"

(NOTE: Since I used a light fabric, I lined it by cutting two more rectangles of white in the same sizes. I kept those pieces on the wrong sides of the main fabric rectangles and proceeded the same way.)

With right sides together, sew both ends of these pieces together with 1/2" seam allowance. Now you should have a tube. Finish the seam allowances unless you are making a lining. In that case, make the same tube with the lining pieces, keep the lining wrong side out and slide it into the main tube so that the wrong sides are together. 


25
Make a casing along the bottom by folding 1/2" to the wrong side twice, sewing along the folded edge leaving a 2" opening and threading 1/4" elastic thru. Cut the elastic to whatever your child's waisq1t measurement is. Close up the opening once you have the elastic in and the ends sewn together.


Repeat on the top edge of the tube, but this time fold under 1/2" then 1." Put in 3/4" elastic the same way as you did on the bottom. On wider elastic casings like this, I also like to topstitch around the very top edge, which you can see in the picture. This gives it a very finished look, which is nice along the top of the shirt. On small children, the length of elastic is usually the same as waist size again, but measure your child around the chest to be sure. 


Time to add the ties. Cut 2 strips that are 2" wide and about 22" long. Fold and press them in half to the wrong side, open the fold back up and press the edges 1/2" in so they meet that middle crease. Fold the first crease again and sew all the way down right at the open edge so you end up with 1/2" wide straps. Sew them onto the inside top of the shirt, placing each 2" in from the side seams. Topstitch so they slant in a little, as shown above. 


See? Easy! You could probably whip up a handful in one afternoon and be set for summer.


I also have some info right here about how I altered a free downloadable pattern to make the sunhat in my look. 


Tuesday, July 10, 2012

Introducing Film Petit- The Life Aquatic


So here's the story. Kristin and I have read each other's blogs and been friendly for a long time. But when I told her that I was about to compete in Season 4 of Project Run & Play, (she was in season 3) we really kicked our online friendship up a notch. Once my competition started, we must have emailed each other an average of 3 times every day. Finally we just started texting all the time and found out that we like all the same awesome things and should really just be BFF's that live in the same place. But alas, I live here in Ohio and she lives in Oregon. Sad face. 

During the sportswear week in PR&P, I couldn't decide what to embroider on Hendrix's shirt, (ended up being the wolf) and she just sent a picture of Ryan Gosling's scorpion jacket from Drive as a suggestion. We had never discussed our shared and strange love for that movie before, but it was my first sign of how awesome she is. Later, during the actual movie-inspired challenge, my husband suggested Drive again and I knew I had to make that jacket. But she was the first to plant the seed!

That was definitely one of the best challenge topics PR&P had ever done, and the sew-alongers had a lot of fun too. But my Drive jacket got crushed in the voting that week. Obviously, it did well enough to go on, but I knew it wouldn't win that week because most people don't know that movie. (Well, that and Kiki's amazing dresses really deserved the win that week.) 

Anyway, the point is, I made that outfit mostly for my own amusement. So Kristin and I decided we wanted to keep doing that with the weird movies that we love and get way too excited about. We are just gonna be total geeks about it all, and combine our movie and sewing geekery into powerful ass-kicking awesomeness. Ok, so we will be the only ones who think of it that way, but we don't care.


First on the list: The Life Aquatic with Steve Zissou. Of course. This took zero deliberating for us to decide on. It's our favorite. I could describe it to you, but that would be dumb and annoying, so just see it. Go ahead and see all of Wes Anderson's movies while you're at it, because this surely won't be the last one we do. 


I made the speedo version of Steve Zissou. Well, these aren't really speedos, they are made from the fantastic Euro Swim Trunks pattern by Jessica of Running with Scissors. I know some people at our local pool may think they are weird on a kid who is obviously not European. But when else in life can a boy pull this off if not at three? I think his tiny butt is about the cutest thing ever in these. Plus, they are actually really practical for swimming and playing. His old trunks were always sagging off of him and weighing him down. Really, every boy five and under should wear these.

The hat I didn't need to make, since his father already owned one from dressing up like SteveZ for a Halloween party years ago. It's a family tradish now.


Elsie's outfit is inspired by a couple things in the movie. Steve's wife Eleanor (the brains behind the Zissou team) is always wearing very relaxed breezy clothes, often in white linen. So that was the fabric I chose for this little bathing suit cover-up/ dress. I love white on a baby. This is the basic pattern, I shortened the sleeves and hem. 


The gorgeous Anjelica Huston as Eleanor Zissou. (She's always smoking a black cigarette in the movie, which I used to do in college every night after work at Ruby Tuesday's. Classy.) 


I also embroidered a "Crayon Ponyfish" on the dress. It's one of the many fictitious oceanic species from the movie. I drew my seahorse shape on some Wonder Under and fused it on using a print from the Velocity Line by Jessica Hogarth. Then I embroidered around it a couple times and added some doodle stitches. (Thanks for the floss donations Jacey and Maureen!)  This embroidery inspired me a lot.


My kid, as Bill Murray, as a depressed failure of a father hunting a jaguar shark. These kinds of things make me smile.


Now go see Kristin's amazing little Kingsley Zissou. She really got the more challenging sewing on this one, and nailed it. Hard.


So what else can you expect from this little ongoing series?


  1. The two of us are going to pick a movie we like each month and make clothing for our kids inspired by the art or characters in that movie. 
  2. Each month we are going to invite a new guest to join us in our Film Petit adventures. 
  3. We probably won't have a set schedule for our posts, but we'll let you know when they are coming. It's a relaxed thing, not a blog series that we are putting a ton of work into to get page hits. We are mostly just entertaining ourselves and anyone else who enjoys this sort of thing.
  4. But you can join in! We have opened up a Film Petit Flickr group and would LOVE to see your pictures of movie-inspired kid stuff you've made. Blockbusters, classics, indie stuff, foreign stuff- whatever!
  5. Kristin and I will be doing regular round-ups of our favorites from the Flickr group, and we just might find our next special guest there. As long as it's movie inspired and handmade for a  small person, it's game. 
  6. Next month we'll be joined by Gail of Probably Actually. This is an adventure. 


Alright, I'm off to listen to some David Bowie. Haven't decided if it will be regular or Portuguese version.